Note: | If you enter a BlackPearl NAS system or Verde NAS system as a Non-Spectra NAS storage location, it will count against the Non‑Spectra NAS storage access limit for licensing. See Licensing for more information. |
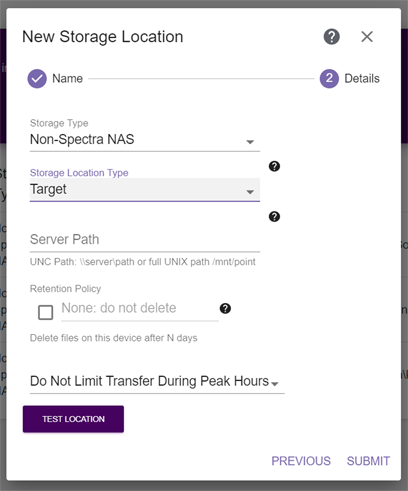
If you select the Non-Spectra NAS storage type, the dialog box updates to display the following fields:
|
Figure 40 The New Storage Location dialog box, Non‑Spectra NAS specific fields. |
1. | For Storage Location Type, select whether the storage location will act as a Source or a Target. |
2. | Enter the file system Server Path to the NAS mount point (\\server\path or full UNIX path /mnt/point). |
IMPORTANT |
Storage location source paths should not overlap. For example:
|
3. | For a target storage location, if desired, select the Retention Policy check box and enter or select the desired number of days to retain files on this storage location before the StorCycle solution automatically deletes the files for compliance or capacity recovery. Clear the Retention Policy check box to keep files permanently. See Retention Policy Best Practices for more information. |
Note: | Retention policies are only supported for data center and enterprise licenses. See Licensing for more information. |
4. | Use the drop-down menu to select either: |
If you selected Do Not Limit Transfer During Peak Hours, continue with Test and Submit the Storage Location.
When you selected Limit Transfer During Peak Hours, the configuration options for limiting transfer display.
Note: | Limiting transfer during peak hours only applies when reading from the storage location. If the Storage Location Type is Source, this occurs when the location is scanned or is the source of a migrate / store project. If the Storage Location Type is Target, this occurs when a restore is done of a file previously migrated / stored to the target. |
|
Figure 41 The Limit Transfer During Peak Hours configuration settings. |
a. | Enter the Peak Hours Bandwidth. The default is 40 MB/s. Spectra Logic recommends starting with 10% of peak load and then adjust as necessary by editing the storage location. |
b. | Enter the maximum Scan Objects per Second during peak hours. The default is 750. |
c. | Select a day of the week for which you want to designate peak hours. The default peak hour selection of 07:00-18:00 (7:00 AM - 6:00 PM) displays. Select and move a handle to change the start and end times. Repeat this step for other days as necessary. |
Note: | The time range is in Coordinated Universal Time (UTC), not local time. |
d. | Use the drop-down menu to select either Do Not Limit Transfer During Off-Peak Hours, or Limit Transfer During Off-Peak Hours. |
If you selected Do Not Limit Transfer During Off-Peak Hours, continue with Enter Non-Spectra NAS Storage Location Information.
When you selected Limit Transfer During Off-Peak Hours, the configuration options for limiting transfer display.
Note: | Limiting transfer during off-peak hours only applies when reading from the storage location. If the Storage Location Type is Source, this occurs when the location is scanned or is the source of a migrate / store project. If the Storage Location Type is Target, this occurs when a restore is done of a file previously migrated / stored to the target. |
|
Figure 42 The Limit Transfer During Off-Peak Hours configuration settings. |
i. | Enter the Off-Peak Bandwidth. The default is 400 MB/s. Spectra Logic recommends starting with 100% of peak load and then adjust as necessary by editing the storage location. |
ii. | Enter the maximum Scan Objects per Second during off-peak hours. The default is 3000. |
Test and Submit the Storage Location
6. | Click Submit to save the project. to save the storage location. |
7. | If necessary, repeat these steps, starting with Step 2 in Configuring Storage to configure additional storage locations. |