If Domain and Local Administrators cannot be used, custom security policy attributes must be added to the account or custom group to access each source and target share.
1. | Use the keyboard shortcut Windows logo key+R to open the Run window. |
2. | In the Open: field enter lusrmgr.msc and click OK. The Local Users and Groups window displays. |
3. | Select the Users folder and select Action > New User. The New User dialog box displays. |
|
Figure 2 The New User dialog box. |
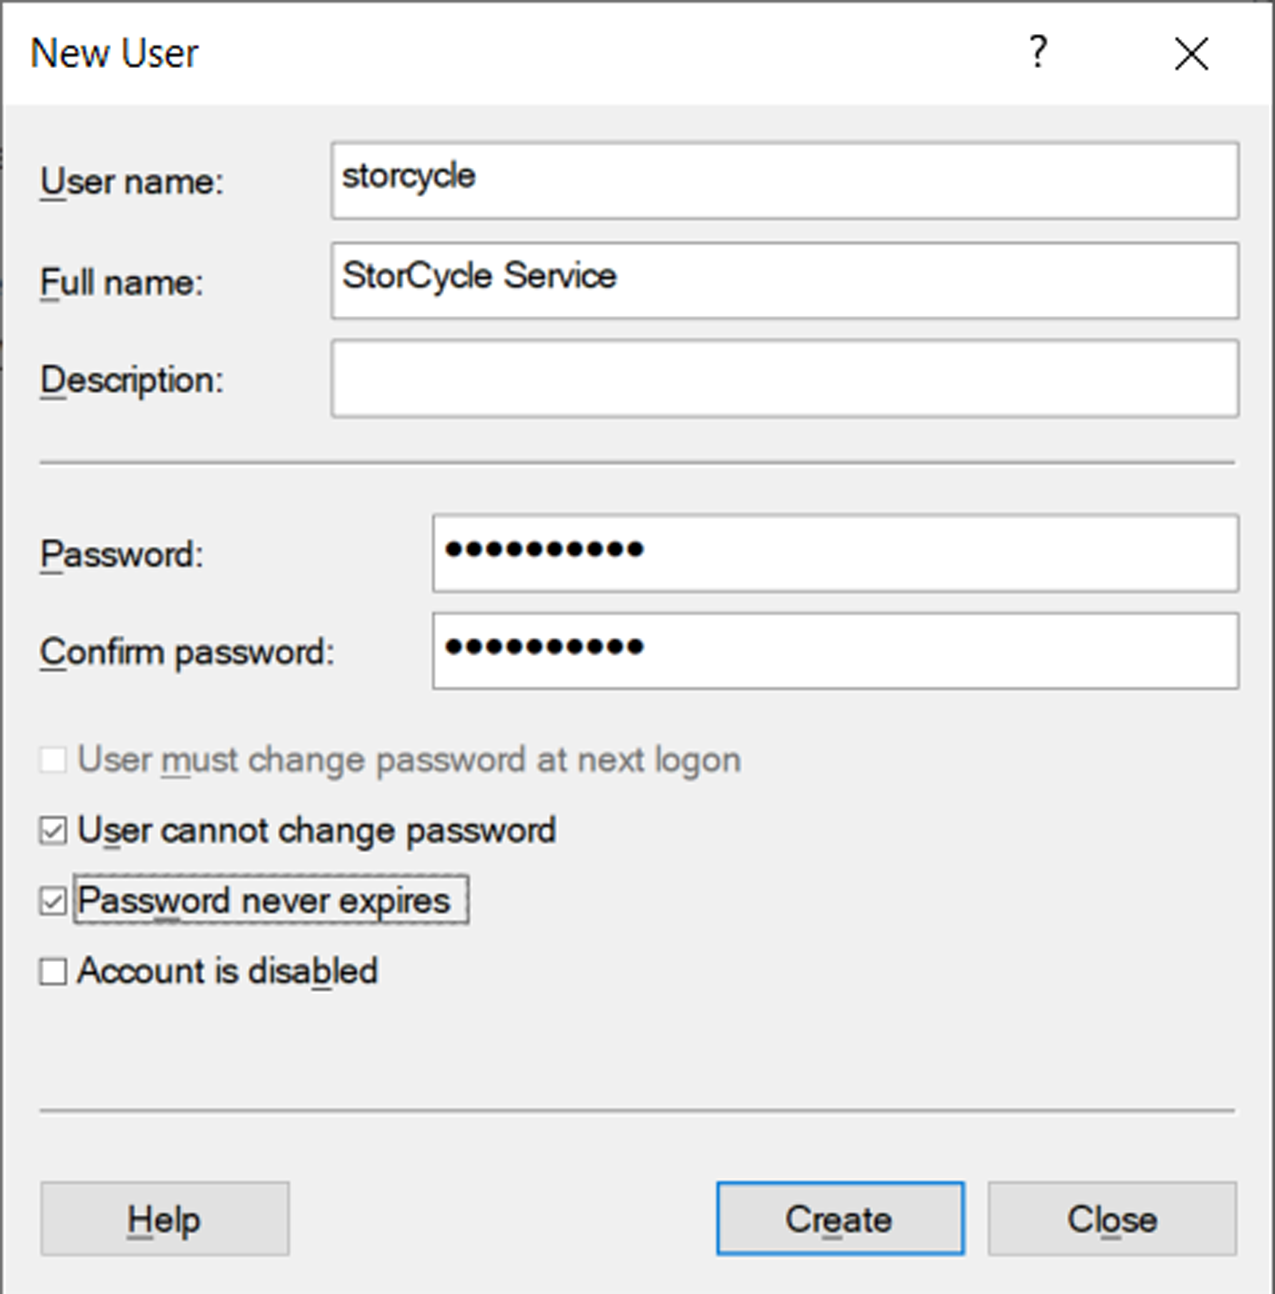
4. | Create a new user account that will be used for the StorCycle service. |
Notes: l | If you want to use the same user as your Spectra NAS equipment, use all lower case for the username. |
l | Spectra Logic recommends that you select the User cannot change password and Password never expires check boxes when creating the new user. |
a. | Provide values for User name (for example, storcycle), Full name, and Password. Record this information. |
b. | Clear the User must change password at next login check box. |
c. | Select the User cannot change password and Password never expires check boxes. |
d. | Click Create and click Close. |
If network access is restricted by group, add the Service User Account to Groups with access to every share that you want to access with the StorCycle solution.
Note: | If the user under which the StorCycle service is running has read-only permissions to a directory on a source storage location, then StorCycle will be unable to place files into the directory with the same name created on a NAS target storage location because the directory will have the same read-only permissions. |
1. | Select the Groups folder. The list of all available groups displays. |
2. | Select a Group that you want to add the Service User Account to and select Action > Add to Group. The Group Properties dialog box displays. |
3. | Click Add. The Select Users, Computers, Service Accounts, or Groups dialog box displays. |
|
Figure 3 The Select Users, Computers, Service Accounts, or Groups dialog box. |
4. | In the From this location field, select the name of the server. The dialog box changes to Select User. |
5. | In the Enter the object names to select field, enter the Service User Account name created in Create a new user account for running the StorCycle service and click Check Names. |
6. | Click OK to add the Service User Account to the Group. |
7. | Repeat to as needed to add the Service User Account to additional groups. |
1. | Open File Explorer. |
2. | Browse the system or network drive for the ProgramData file. |
Note: | ProgramData is a hidden folder, you may need to change File Explorer options to see it. |
3. | Right click the Spectra Logic Corporation directory and select Properties. The Spectra StorCycle Properties screen displays. |
|
Figure 4 The Spectra Logic Corporation Properties dialog box. |
4. | Select the Security tab and click Edit, then click Add. The Select Users, Computers, Service Accounts, or Groups dialog box displays. |
|
Figure 5 The Select Users, Computers, Service Accounts, or Groups dialog box. |
5. | Click Locations, select local computer, and then click OK. The dialog box changes to Select Users or Groups. |
6. | In the Enter the object names to select field, enter the Service User account name created in Configure a Custom Owner of Files and Folders and click Check Names, then click OK. |
7. | Select the newly created Service User account in the Group or user names field. In the Permissions for pane, in the Allow column, select Full Control, and click OK. |
8. | Click OK again. |
1. | Use the keyboard shortcut Windows logo key+R to open the Run window. |
2. | In the Open: field enter secpol.msc and click OK. The Local Security Policy window displays. |
3. | Select the Local Policies folder in the left pane, and double-click User Rights Assignment in the right pane. |
4. | Double-click the policy Take ownership of files and other objects. The “Take ownership of files and other object Properties” dialog box displays. |
5. | Click Add User or Group.... The Select Users, Computers, Service Accounts, or Groups dialog box displays. See Figure 3. |
6. | Click Object Types. The Object Types dialogue box displays. |
7. | Select all of the Object types listed and click OK. |
8. | Click Locations and select the name of the server and click OK. The dialog box changes to Select Users or Groups. |
9. | In the Enter the object names to select field, enter the Service User account name created in Configure a Custom Owner of Files and Folders and click Check Names and then click OK. |
10. | Click OK again. |
The user running the StorCycle service must be able to access and have permission to read and write on all of the storage locations in the StorCycle environment.
Notes: l | If the user under which the StorCycle service is running has read-only permissions to a directory on a NAS source storage location, then StorCycle will be unable to place files into the directory with the same name created on the target storage location because the directory will have the same read-only permissions. |
l | Spectra Logic recommends mounting Isilon CIFS shares for the user running the StorCycle solution using the "map network drive" wizard or the "net use" command. |
1. | Sign in to Windows using the new user account created in Configure a Custom Owner of Files and Folders. |
2. | Open File Explorer. |
3. | Select This PC on the left. |
4. | Click Map Network Drive. The Map Network Drive dialog box displays. |
5. | Select a drive letter and enter a folder path for a Storage Location you want to use in the StorCycle solution. |
6. | Select Reconnect at sign-in and Connect using different credentials. |
7. | Click Finish. |
8. | Enter the credentials for the user account you want to use to connect to the NAS storage location. Select Remember my credentials and then click OK. |
9. | Repeat through for additional NAS storage locations. |
If the user running the StorCycle service is used to Migrate / Store data to a NAS storage location, configure the permissions as described below.
1. | Sign in to Windows using the new user account created in Configure a Custom Owner of Files and Folders. |
2. | Open File Explorer. |
3. | Navigate to the NAS share, or a folder in the NAS share. |
4. | Right-click the share, then select Properties. |
5. | Select the Security tab, then click Advanced. The Advanced Security Settings screen displays. |
|
Figure 6 The Advanced Permission Settings. |
6. | Click Add. The Permission Entry screen displays. |
|
Figure 7 The Permissions Entry screen. |
7. | If necessary, select a Principal user. |
8. | Using the Applies To drop-down menu, select This folder, files and subfolders. |
9. | Under Basic Permissions, select Full Control. |
10. | Click OK to close the Permissions Entry screen, then click OK to close the Advanced Permission Setting screen. |
11. | Click OK to close the Folder Properties screen. |
12. | Repeat through for additional NAS storage locations. |
If migrate / store projects will replace files with symbolic links for transparent access, ensure the new user can create symbolic links.
1. | Use the keyboard shortcut Windows logo key+R to open the Run window. |
2. | In the Open: field enter secpol.msc and click OK. The Local Security Policy window displays. |
3. | Select Local Policies > User Rights Assignment, and then double-click Create symbolic links. The Create symbolic links Properties screen displays. |
4. | Add the Service User account name. |