Using the Embedded BlackPearl Dashboard
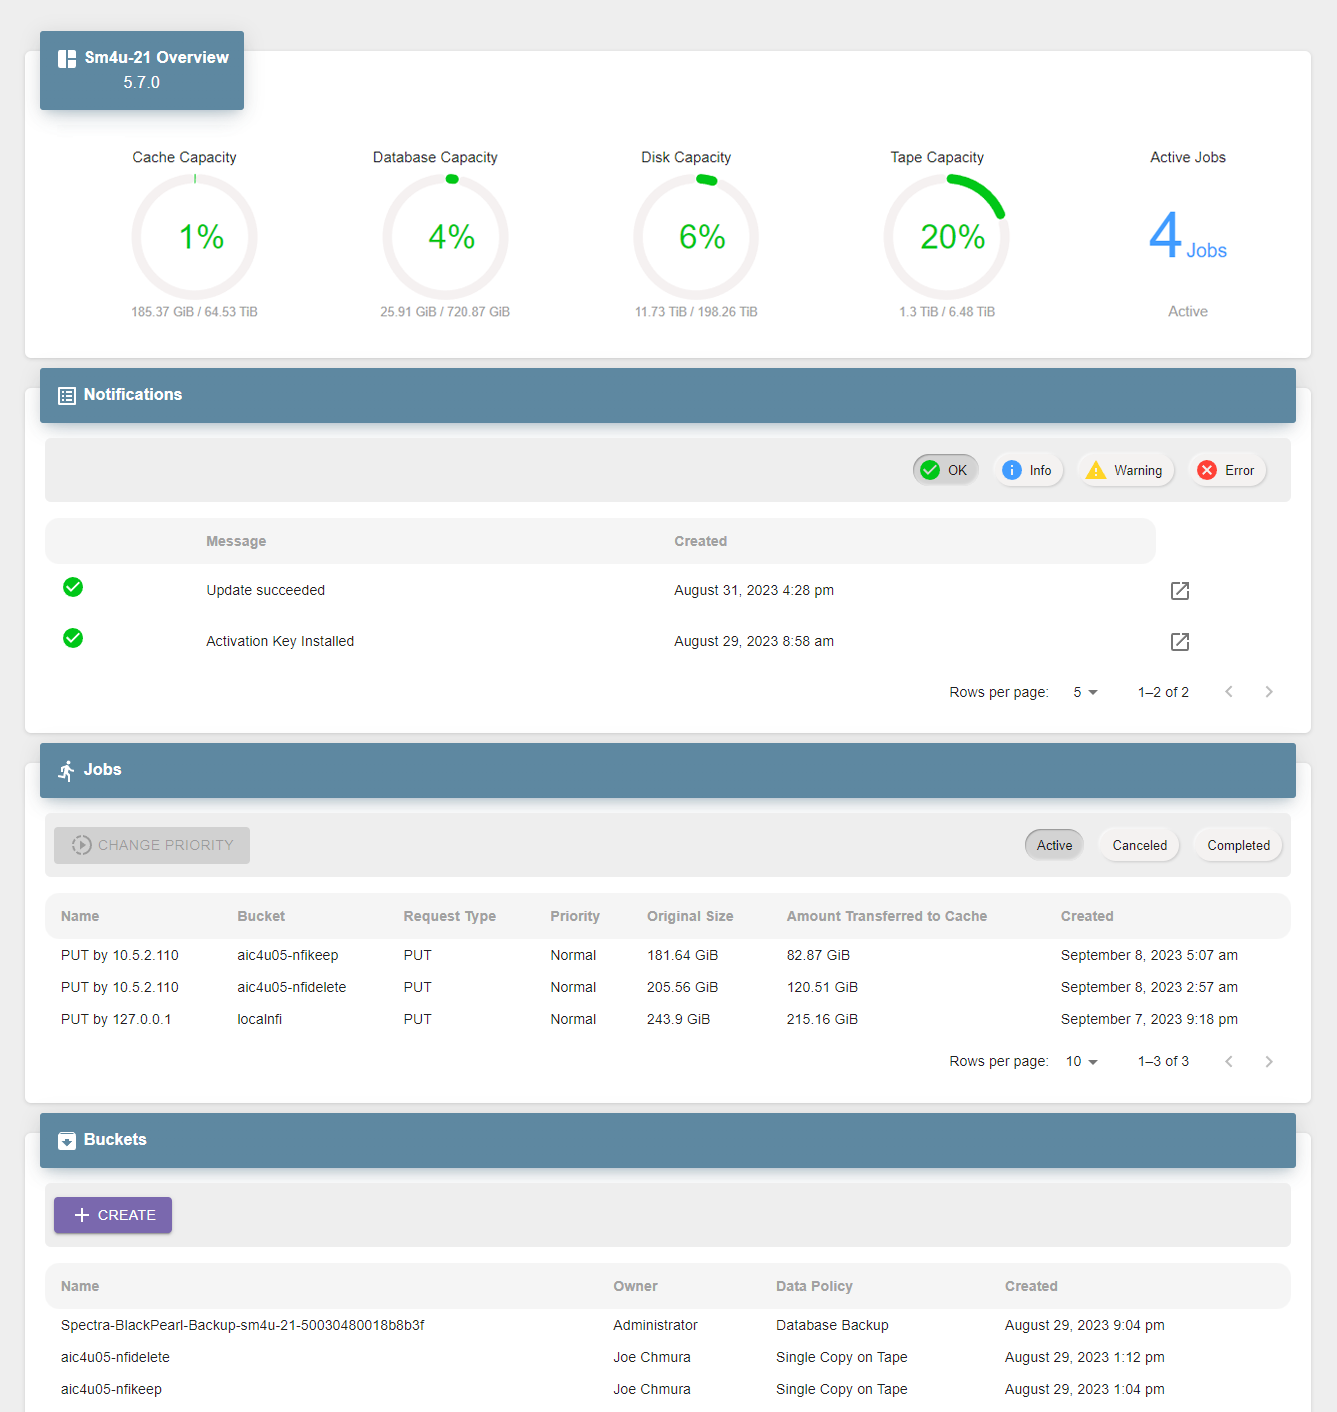
The embedded BlackPearl dashboard allows you to quickly view the status of critical aspects of a BlackPearl system in the Vail sphere, and easily perform commonly used functions of the system.
View the Status of the BlackPearl System
Use the sections below to view the status of multiple aspects of the BlackPearl system.
View System Overview
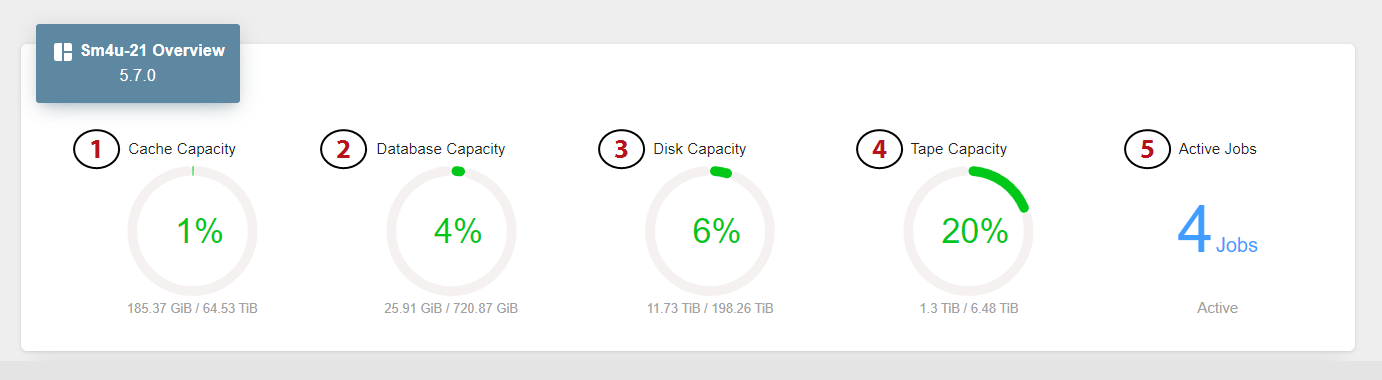
The Overview pane provides a quick look at the most critical aspects of the BlackPearl system.
|
1.
|
The BlackPearl system cache capacity and percentage of used cache space. |
|
2.
|
The capacity of the BlackPearl system database and percentage of used space. |
|
3.
|
The capacity of all disk-based storage connected to the BlackPearl system and percentage of used space. |
|
4.
|
The capacity of all tape-based storage in the tape library connected to the BlackPearl system and percentage of used space. |
|
5.
|
The number of active jobs running on the BlackPearl system. |
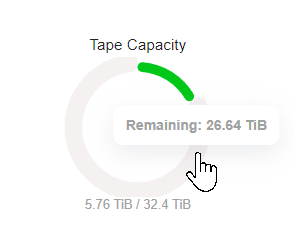
Mouse-over the green section of any percentage graph to display the amount of used space, and over the gray section to display the amount of remaining space.
View Notifications
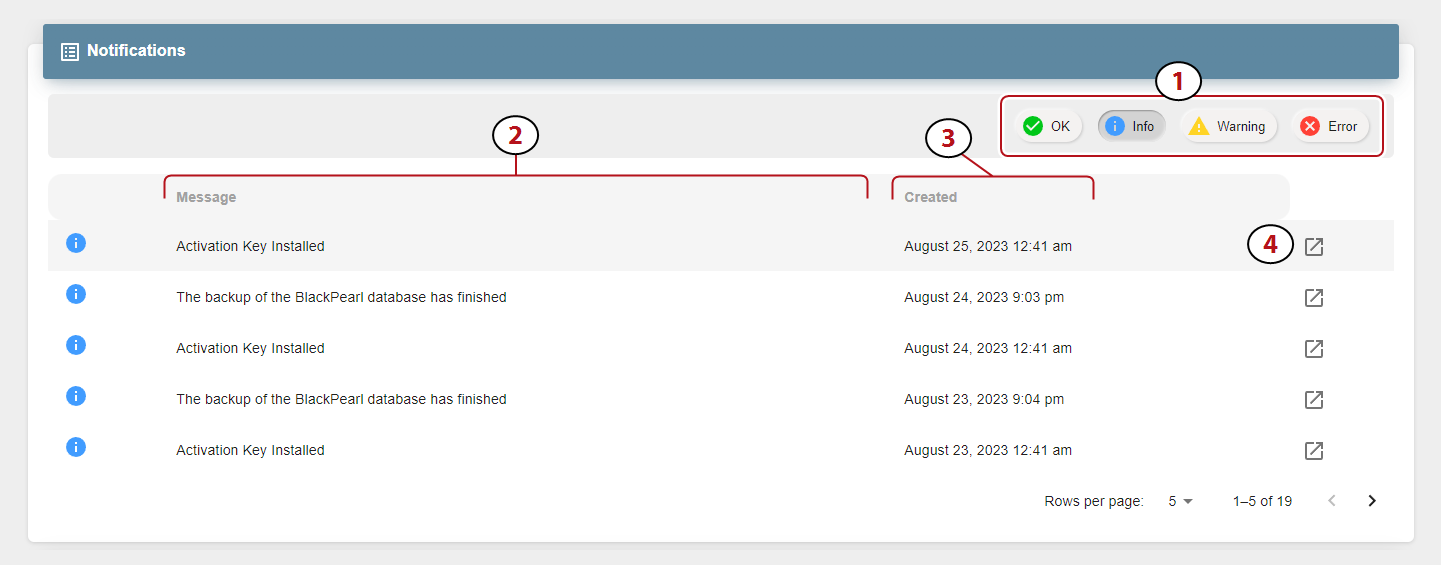
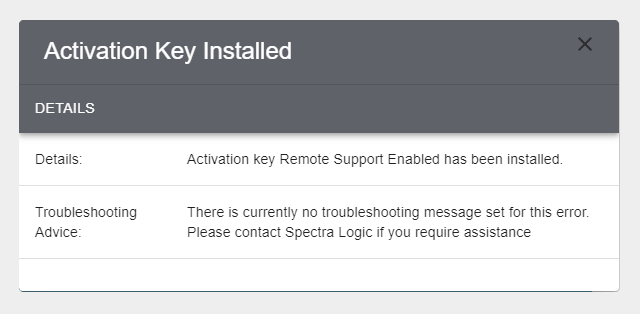
Notifications provide information about errors that occur on the system, caution messages that alert you to issues that may impact your workflow, and informational messages. Additionally, notifications may provide troubleshooting advice to help you resolve issues that may occur.
|
1.
|
Use the Notification Type buttons to switch between OK, Info, Warning, and Error messages. |
|
2.
|
Contains a brief description of the notification. |
|
3.
|
Displays the timestamp the notification was generated. |
|
4.
|
Click the Details Button to view additional message Details and Troubleshooting Advice. |
View Jobs
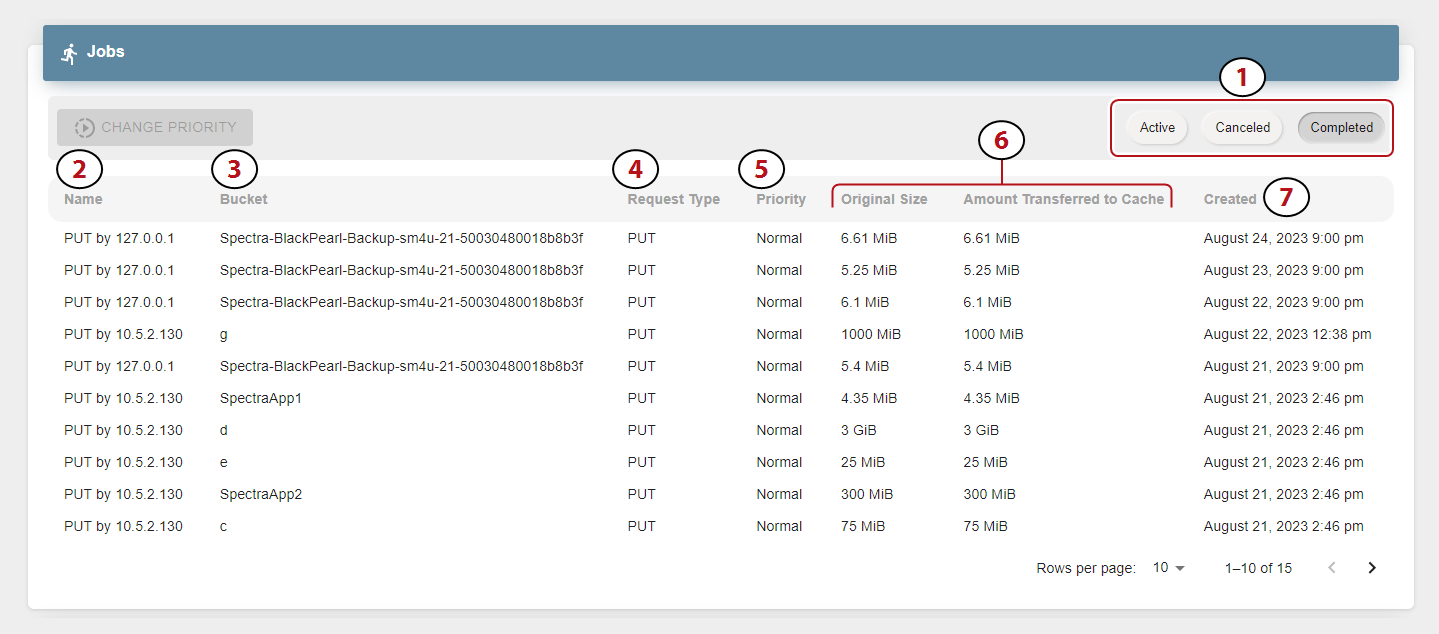
The Jobs pane provides information on each Active, Canceled, or Completed job processed by the BlackPearl system.
|
1.
|
Use the Job Type buttons to switch between Active, Canceled, and Completed jobs. |
|
2.
|
The name of the job includes the job type and the IP address of the job initiator. |
|
3.
|
The bucket used in the PUT or GET operation. |
|
4.
|
The type of job request. |
|
5.
|
The assigned priority of the job. |
|
6.
|
The original size and amount of data transferred to the BlackPearl system cache. |
|
7.
|
Displays the timestamp of when the job was initiated. |
Use the Change Priority button to change the priority of an active job. See Change Job Priority for more information.
View Buckets
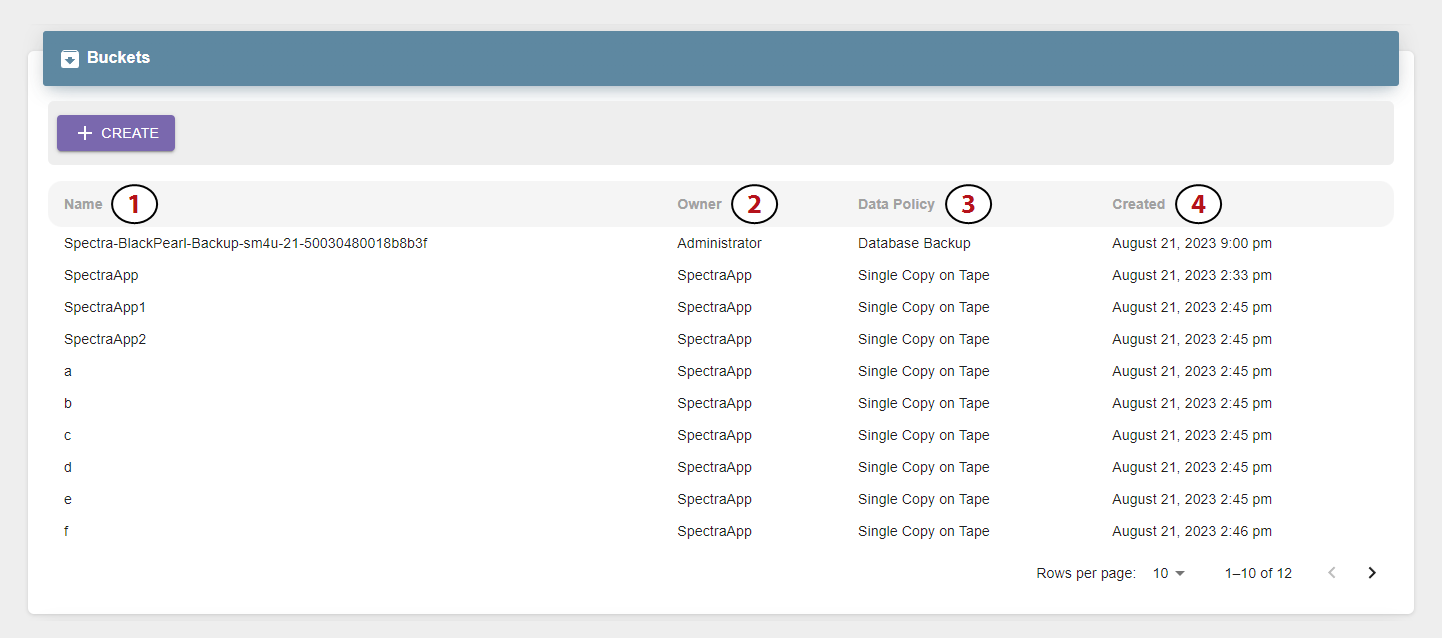
The Buckets pane provides information about all buckets configured on the BlackPearl system.
|
1.
|
Displays the name of the bucket. |
|
2.
|
The bucket owner configured on the BlackPearl system. |
|
3.
|
The data policy used by the bucket. |
|
4.
|
Displays the timestamp of when the bucket was created. |
Use the Create button to create a new bucket. See Create a Bucket for instructions.
View Pools
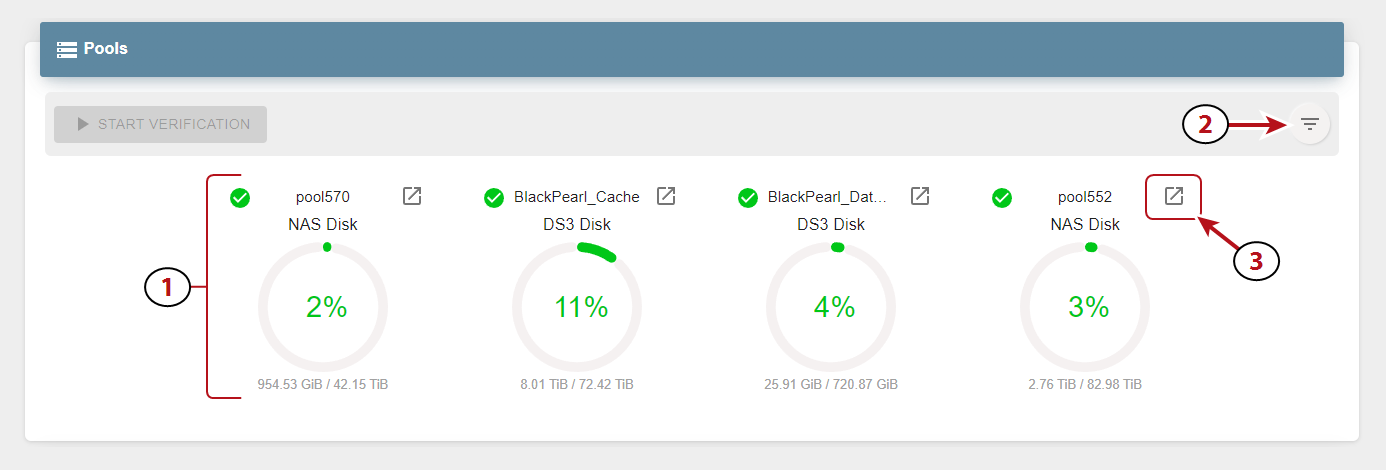
The Pools pane displays information about all disk storage pools configured on the BlackPearl system including dedicated BlackPearl system cache and database pools.
|
1.
|
Each percentage graph displays both the used and remaining space for the associated pool. |
|
2.
|
Use the Filter button to select which pools to display on the Pools pane. |
|
3.
|
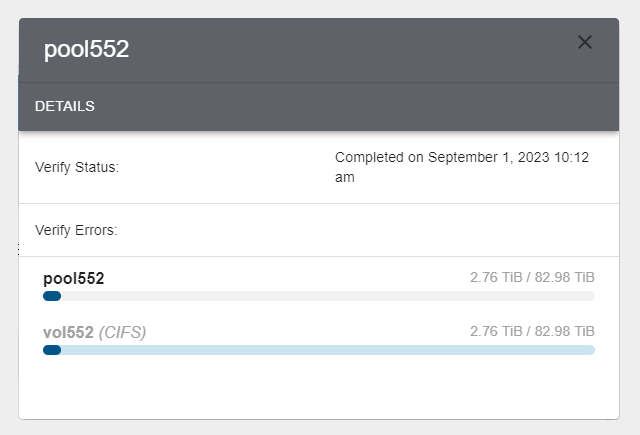
Click the Details button to view additional information about a specified pool. |
Use the Start Verification button to verify the data contained on the pool. See Start a Storage Pool Verification for more information.
View Volumes
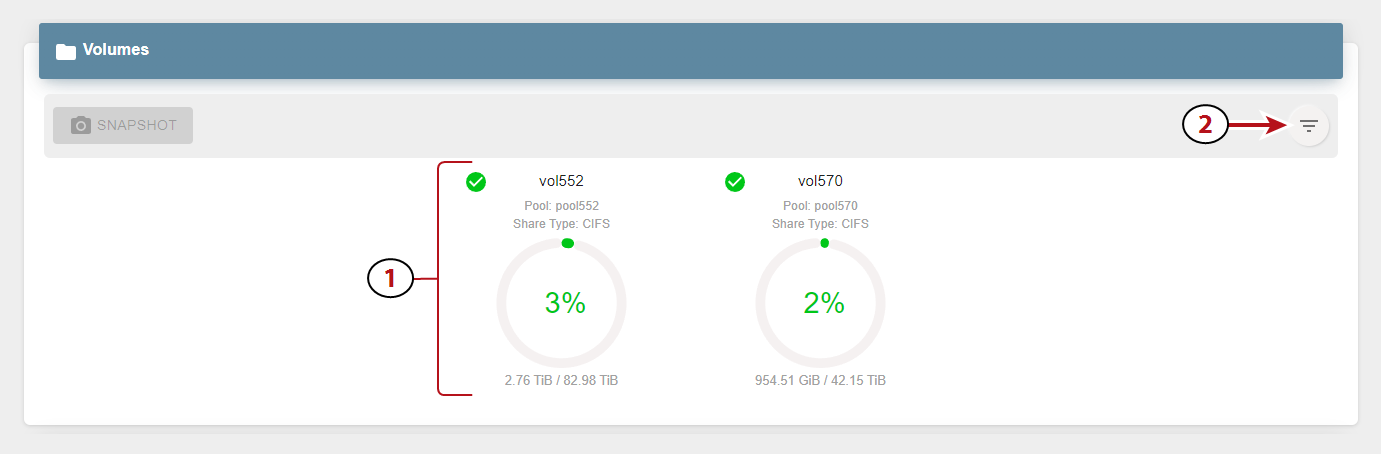
The Volumes pane displays information about all volumes configured on the BlackPearl system.
|
1.
|
Each percentage graph displays both the used and remaining space for the associated pool. |
|
2.
|
Use the filter button to select which pools to display on the Pools pane. |
Use the Snapshot button to create a snapshot. For more information see Create a Volume Snapshot.
View Tape Partitions - Main View
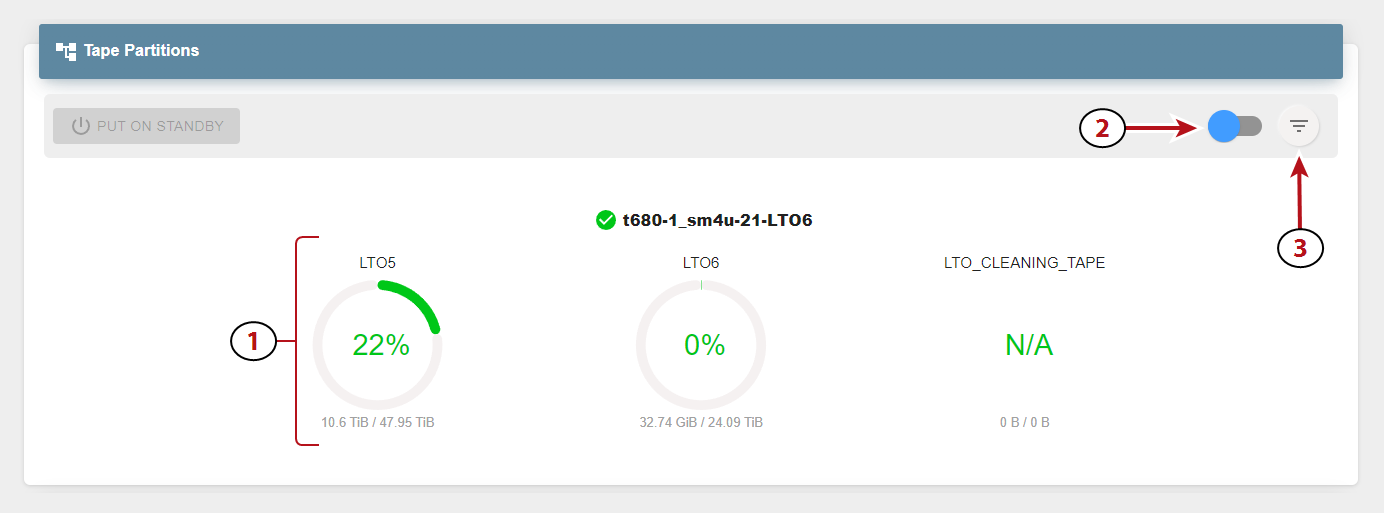
The Tape Partitions pane displays information about the tape partitions configured on the tape library attached to the BlackPearl system. The Tape Partitions pane features both a main view and a tape cartridge state view.
To display the main view, manipulate the slider (2) to the left position.
|
1.
|
Each percentage graph displays both the used and remaining space for the associated type and generation of media present in the tape partition. Mouse-over the green section of any percentage graph to display the amount of used space, and over the gray section to display the amount of remaining space. |
|
2.
|
Use the slider to change the display a graph of the current state of each tape cartridge present in the partition. |
|
3.
|
Use the Filter button to select which pools to display on the Tape Partitions pane. |
If you need to service the tape library, you can put a tape partition into a standby state. See Put a Tape Partition into Standby for more information.
View Tape Partitions - Tape State View
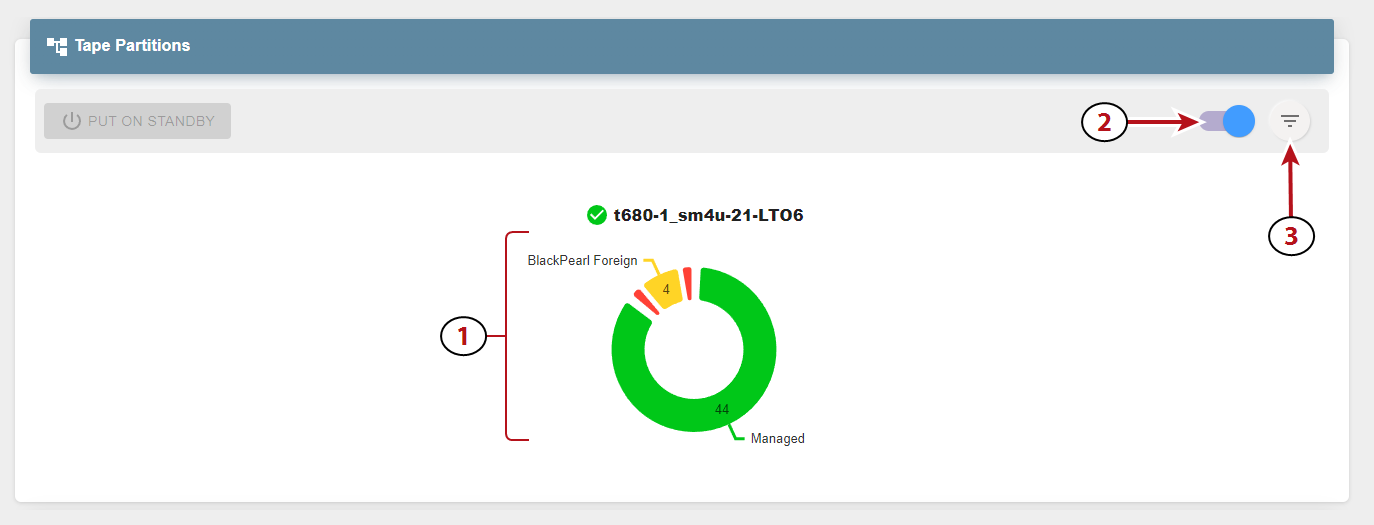
The Tape Partitions pane displays information about the tape partitions configured on the tape library attached to the BlackPearl system. The Tape Partitions pane features both a main view and a tape cartridge state view.
To display the tape cartridge state view, manipulate the slider (2) to the right position.
|
1.
|
The state of all tape cartridges in the partition. Each state combines different generations of tape media if present. Mouse-over any part of the graph to display more detailed information. |
|
2.
|
Use the slider to change the display a graph of the current state of each tape cartridge present in the partition. |
|
3.
|
Use the Filter button to select which pools to display on the Tape Partitions pane. |
If you need to service the tape library, you can put a tape partition into a standby state. See Put a Tape Partition into Standby for more information.
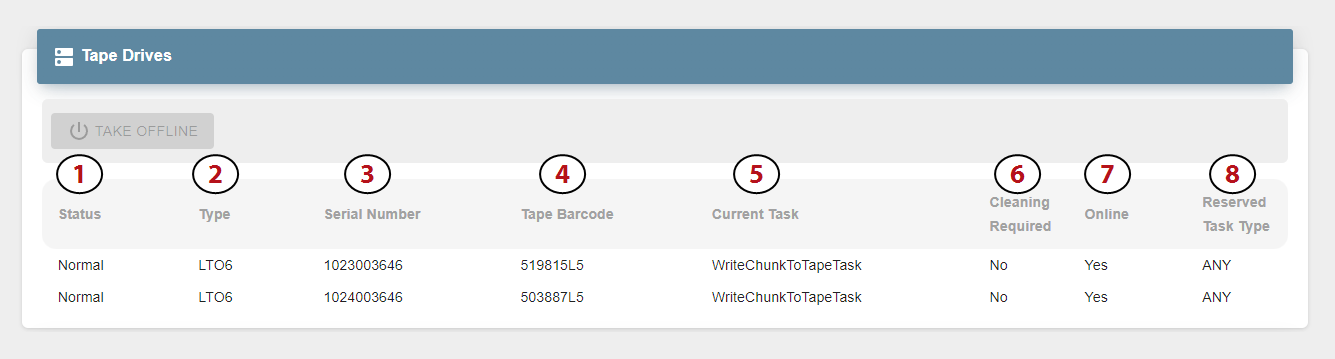
View Tape Drives
The Tape Drives pane displays information about all tape drives installed in the tape library connected to the BlackPearl system.
|
1.
|
The current status of the tape drive. |
|
2.
|
The drive type and generation. |
|
3.
|
The drive serial number as assigned by the tape library. |
|
4.
|
The physical barcode of the tape cartridge loaded into the tape drive. This field is blank when no tape is loaded. |
|
5.
|
The current task being performed by the drive. This field is blank when no task is in progress. |
|
6.
|
Indicates if the tape drive requires cleaning. |
|
7.
|
Indicates if the tape drive is online or offline. |
|
8.
|
The reserved task type, if configured. The default setting is Any. |
Use the Take Offline button to take the drive offline. See Offline a Tape Drive for more information.
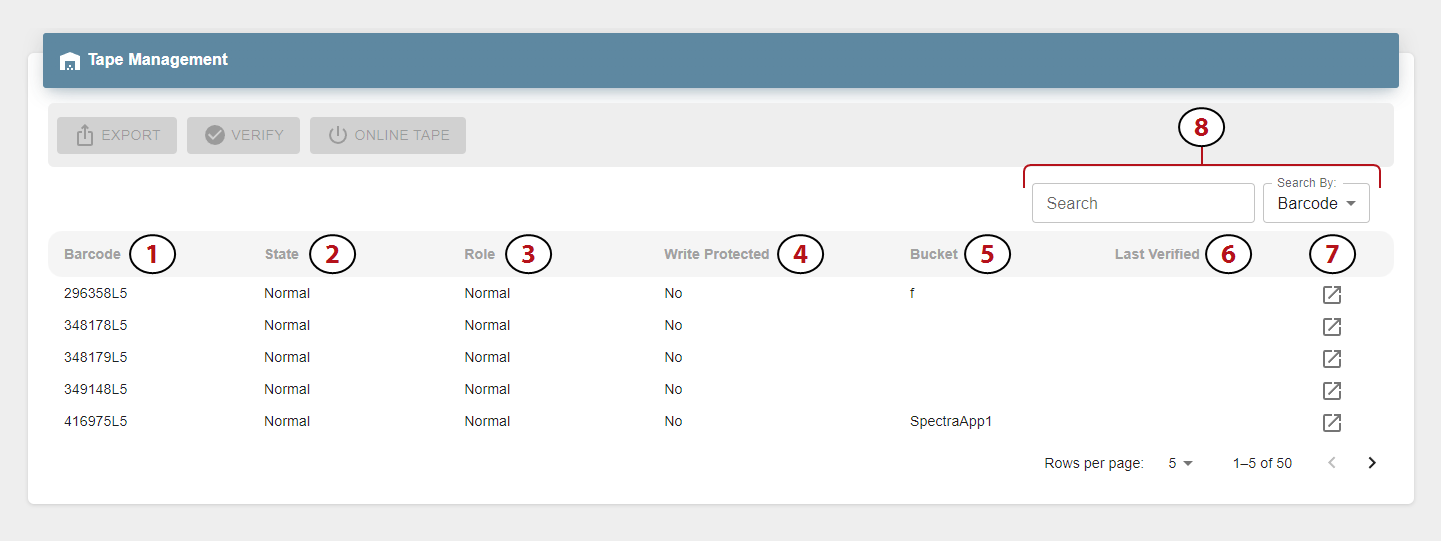
View Tape Management
The Tape Management pane displays the status of all managed tapes in the tape library connected to the BlackPearl gateway.
|
1.
|
The physical barcode label on the tape cartridge. |
|
2.
|
The current state of the tape cartridge. |
|
3.
|
Indicates if the tape is configured for use as a Normal or Test tape. |
|
4.
|
The physical Write Protected status of the tape cartridge. |
|
5.
|
The name of any BlackPearl system bucket(s) present on the tape cartridge. |
|
6.
|
Displays the timestamp of the last tape verification. |
|
7.
|
Click the Details button to display additional information about the selected tape cartridge. |
|
8.
|
Use the Search entry field and Search By drop-down menu to find a specific tape cartridge. |
See one of the following sections for instructions to export, verify, or online a tape cartridge:
Dashboard Actions
In addition to displaying information about the BlackPearl system, the embedded dashboard allows you to perform the most frequently-used actions as described in the sections below.
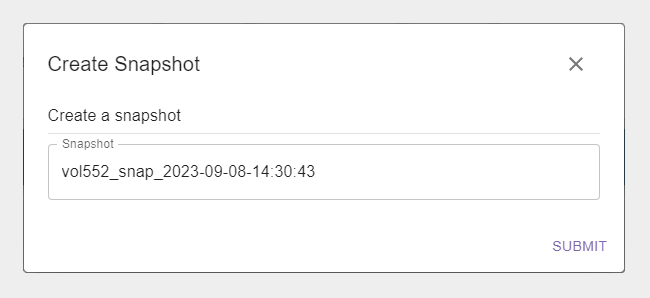
Create a Volume Snapshot
A volume snapshot is an image of a volume's configuration and data makeup as they were when the snapshot was generated. Restoring to a previously created snapshot allows you to go “back in time” and restore the volume to the state it was in when the snapshot was created.
See Volume Snapshots on page 1 for more information.
Here is how to create a volume snapshot:
|
1.
|
In the BlackPearl dashboard, navigate to the Volumes pane. |
|
2.
|
Select the volume for which you want to create a snapshot. |
|
4.
|
If desired, edit the pre-generated Snapshot name. |
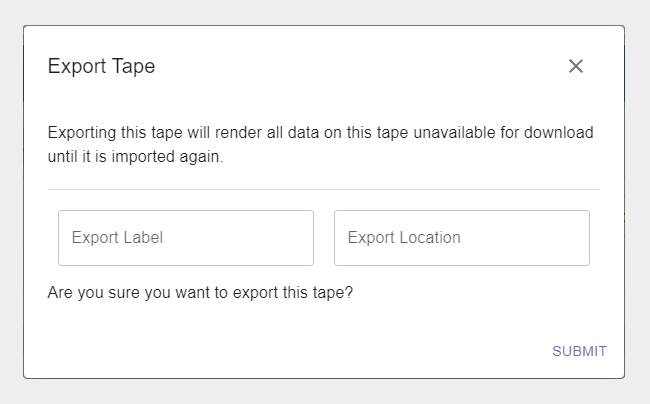
Export a Tape Cartridge
Exporting a tape cartridge prepares it for physical removal from the attached tape library. In a Spectra Logic tape library, the cartridge is moved from the storage pool to the Entry/Exit pool, before it is physically exported from the library at the library front panel.
|
1.
|
In the BlackPearl system dashboard, navigate to the Tape Management pane. |
|
2.
|
Select the tape you want to export. |
|
4.
|
If desired, edit the Export Label and Export Location. |
Online a Tape Cartridge
Setting a tape cartridge to "online" prepares the cartridge for use by the BlackPearl system. This allows the system to use the tape cartridge for data storage operations.
Here is how to online a tape cartridge:
|
1.
|
In the BlackPearl system dashboard, navigate to Tape Management. |
|
2.
|
Select a tape in the Offline state. |
Verify a Tape Cartridge
The BlackPearl system can perform a data integrity verification of all data on a selected tape cartridge to confirm it is still viable. While the verification is in progress, client access has priority over the data integrity scan.
Here is how to verify a tape cartridge:
|
1.
|
In the BlackPearl system dashboard, navigate to Tape Management. |
|
2.
|
Select the tape you want to verify. |
Change Job Priority
If desired, you can change the priority of an active job on the BlackPearl system.
Here is how you change the priority of a job:
|
1.
|
In the BlackPearl system dashboard, navigate to the Jobs pane. |
|
2.
|
If necessary, click Active to display the list of active jobs. |
|
3.
|
Select the job for which you want to change priority and click Change Priority. |
|
4.
|
Use the drop-down menu to select a new priority for the job. |
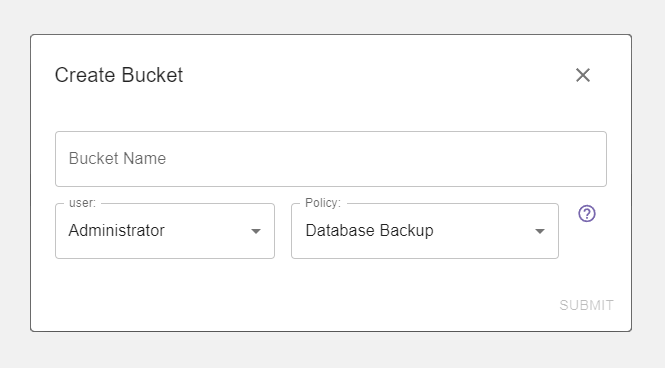
Create a Bucket
Buckets on the BlackPearl system are data transfer targets for read and write operations. When you create a new bucket on the system, you assign it a owner and a data policy. You can then use the new bucket in your other Spectra software applications as a target for data storage on the BlackPearl system.
Here is how you create a new bucket:
|
1.
|
In the BlackPearl system dashboard, navigate to the Buckets pane. |
|
4.
|
Using the User drop-down menu, select an owner for the bucket. |
|
5.
|
Using the Policy drop-down menu, select a data policy for the bucket. |
Start a Storage Pool Verification
The BlackPearl system can perform a data integrity verification of all data on a selected storage pool to confirm it is still viable.
Here is how to start data verification on a storage pool:
|
1.
|
In the BlackPearl system dashboard, navigate to the Pools pane. |
|
2.
|
Select the pool that you want to verify. |
|
3.
|
Click Start Verification. |
Put a Tape Partition into Standby
If you need to perform service on the tape library associated with your BlackPearl gateway, or with the BlackPearl gateway itself, you must first put the tape library into a standby state. Otherwise, the BlackPearl gateway may attempt to use the tape library while it is in service.
|
Note:
|
After the tape partition is placed in standby, any currently running tape operations continue until they are complete, which may take 30 minutes or longer. |
Here is how to out a tape partition into standby:
|
1.
|
In the BlackPearl dashboard, navigate to the Tape Partitions pane. |
|
2.
|
Select the partition you want to set to standby. |
Offline a Tape Drive
If a tape drive is experiencing errors and needs to be physically replaced, the drive can be taken offline to prevent the BlackPearl system from using the drive for data storage operations until the replacement is complete.
Here is how to offline a tape drive:
|
1.
|
In the BlackPearl system dashboard, navigate to the Tape Drives pane. |
|
2.
|
Select the drive you want to offline. |