Figure 36 The New Storage Location dialog box with Spectra NAS specific fields.
|
IMPORTANT |
The StorCycle solution requires that a Spectra NAS system be running BlackPearl or Verde 5.1.2 or later. |
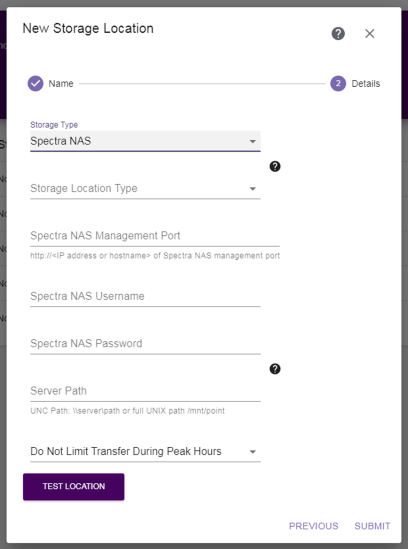
If you select the Spectra NAS storage type for a Spectra BlackPearl NAS or Verde system, the dialog box updates to display the following fields:
|
|
|
Figure 36 The New Storage Location dialog box with Spectra NAS specific fields. |
| 1. | For Storage Location Type, select whether the storage location will act as a Source or a Target. |
| 2. | Enter the IP address or hostname for the Spectra NAS Management Port. Include http://. |
| Note: | The Spectra NAS Management Port, and Spectra NAS Username and Password are used to authenticate that this is Spectra NAS for licensing purposes. See Licensing for more information. |
| 3. | Enter the Username of a user with Login user access as well as Monitor and/or Administrator user access, or if the Spectra NAS system has Active Directory configured, an Active Directory administrator. |
| 4. | Enter the Password associated with the username entered above. |
| 5. | Enter the file system Server Path to the NAS mount point (\\server\path or full UNIX path /mnt/point). |
|
IMPORTANT |
Storage location source paths should not overlap. For example:
|
| 6. | Use the drop-down menu to select either: |
If you select Do Not Limit Transfer During Peak Hours, continue with Test and Submit the Storage Location.
When you select Limit Transfer During Peak Hours, the configuration options for limiting transfer display.
| Note: | Limiting transfer during peak hours only applies when reading from the storage location. If the Storage Location Type is Source, this occurs when the location is scanned or is the source of a migrate / store project. If the Storage Location Type is Target, this occurs when a restore is done of a file previously migrated / stored to the target. |
|
|
|
Figure 37 The Limit Transfer During Peak Hours configuration settings. |
| a. | Enter the Peak Hours Bandwidth. The default is 40 MB/s. Spectra Logic recommends starting with 10% of peak load and then adjust as necessary by editing the storage location. |
| b. | Enter the maximum Scan Objects per Second during peak hours. The default is 750. |
| c. | Select a day of the week for which you want to designate peak hours. The default peak hour selection of 07:00-18:00 (7:00 AM - 6:00 PM) displays. Select and move a handle to change the start and end times. Repeat this step for other days as necessary. |
| Note: | The time range is in Coordinated Universal Time (UTC), not local time. |
| d. | Use the drop-down menu to select either Do Not Limit Transfer During Off-Peak Hours, or Limit Transfer During Off-Peak Hours. |
If you select Do Not Limit Transfer During Off-Peak Hours, continue with Test and Submit the Storage Location.
When you select Limit Transfer During Off-Peak Hours, the configuration options for limiting transfer display.
| Note: | Limiting transfer during off-peak hours only applies when reading from the storage location. If the Storage Location Type is Source, this occurs when the location is scanned or is the source of a migrate / store project. If the Storage Location Type is Target, this occurs when a restore is done of a file previously migrated / stored to the target. |
|
|
|
Figure 38 The Limit Transfer During Off-Peak Hours configuration settings. |
| i. | Enter the Off-Peak Bandwidth. The default is 400 MB/s. Spectra Logic recommends starting with 100% of peak load and then adjust as necessary by editing the storage location. |
| ii. | Enter the maximum Scan Objects per Second during off-peak hours. The default is 3000. |
Test and Submit the Storage Location
| 8. | Click Submit to save the project. to save the storage location. |
| 9. | If necessary, repeat these steps, starting with Step 2 in Configuring Storage to configure additional storage locations. |