Use the instructions below to configure a new user.
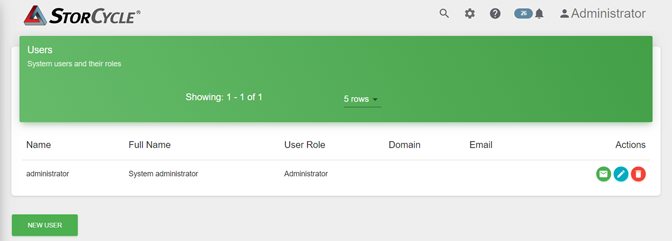
| 1. | Click the Settings icon (gear) in the toolbar and then select Users. The Users screen displays showing all users currently configured in the software. |
|
|
Configure users to manage access to the server.
| Note: | The number of users may be restricted by the license installed. See Licensing for more information. |
Use the instructions below to configure a new user.
| 1. | Click the Settings icon (gear) in the toolbar and then select Users. The Users screen displays showing all users currently configured in the software. |
|
|
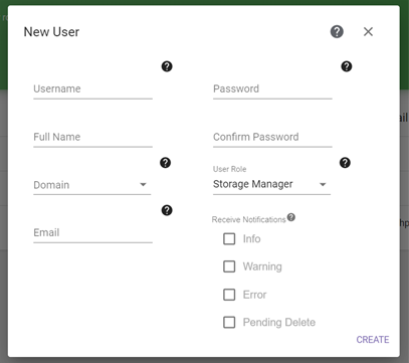
| 2. | Click New User. The New User dialog box displays. |
|
|
|
Figure 15 The New User dialog box for a Non-Domain User. |
| 3. | Enter the Username for the user. If you are using Active Directory Domain user, the username must match the Active Directory user name. |
| Note: | Usernames are case insensitive. |
| 4. | Enter the user’s Full Name. |
| 5. | If Active Directory / LDAP is configured, select the Domain, or select Non-domain User. |
| Note: | If Active Directory / LDAP is not configured, the Domain drop-down does not display. |
| • | If Active Directory / LDAP is not configured, or you selected Non-Domain User, continue with Non-Domain User. |
| • | If you selected a Domain, continue with Domain User. |
| a. | If desired, enter an email address for the user. An email address is required if you want the server to send email notifications to this user. |
| Note: | SMTP must be configured for the StorCycle solution to send email. See Configure SMTP. |
| b. | Enter a Password and confirm the password. Spectra Logic recommends that the password be at least 8 characters long and contain an upper case letter, a number, and a special character (!@ # $ - = etc.). |
| c. | Enter the role for the user: |
| • | Administrator—Administrators can access the StorCycle user interface, migrate and restore data, and change the configuration settings. |
| • | Storage Manager (default)—Storage Managers can view the StorCycle console and migrate and restore data, but cannot change the configuration. |
| d. | Select the types of notifications to send to the user. The SMTP settings must be configured in order to send emails. See Configure SMTP. |
| • | Info - An expected event occurred such as a job starting or completing successfully. |
| • | Warning - A job completed with warnings or errors, for example, a file to be migrated / stored was already migrated / stored, therefore, it was skipped. Determine the cause of the problem and remedy it if necessary. |
| • | Error - A job failed with warnings or errors, for example, the StorCycle solution cannot communicate with a storage location. Determine the cause of the error and remedy it as soon as possible. |
| • | Pending Delete - Files are scheduled for deletion from a storage location with a retention policy. Notifications are sent five days prior to file deletion. |
| e. | Click Submit to save the user configuration. |
When you select a domain, the dialog box updates to display the domain user fields.
|
|
|
Figure 16 The New User dialog box for a Domain User. |
| a. | Enter the role for the user: |
| • | Administrator—Administrators can access the StorCycle user interface, migrate and restore data, and change the configuration settings. |
| • | Storage Manager (default)—Storage Managers can view the StorCycle console and migrate and restore data, but cannot change the configuration. |
| b. | Select the types of notifications to send to the user. The SMTP settings must be configured in order to send emails. See Configure SMTP. |
| • | Info - An expected event occurred such as a job starting or completing successfully. |
| • | Warning - A job completed with warnings or errors, for example, a file to be migrated / stored was already migrated / stored, therefore, it was skipped. Determine the cause of the problem and remedy it if necessary. |
| • | Error - A job failed with warnings or errors, for example, the StorCycle solution cannot communicate with a storage location. Determine the cause of the error and remedy it as soon as possible. |
| • | Pending Delete - Files are scheduled for deletion from a storage location with a retention policy. Notifications are sent five days prior to file deletion. |
| c. | Click Submit to save the user configuration. |
| 6. | If necessary, repeat this process starting with Step 2 to add additional users. |
To edit a user, click the Edit icon (blue circle with a pencil) next to the user on the Users screen (see Figure 14). Edit the Full Name, Email, Password, User Role, and Notifications (see Configure Users for more information) as desired and click Update. If you want to change the username of a user, delete the user and then recreate the user with the new name.
| Note: | To use the Send Request to Administrator HTML links, SMTP must be configured (see Configure SMTP) and an email address must be configured for the Administrator user. |
To send a test email to a user, click the Send Test Email icon (green circle with an envelope) next to the user on the User screen (see Figure 14). The email is sent immediately.
To delete a user, click the Delete / Disable icon (red circle with a trash can) next to the user on the User screen (see Figure 14). A confirmation screen displays. Click Delete to confirm the project deletion.