The Project Name screen of the Migrate / Store wizard allows you to configure the project name and storage location.
|
Figure 76 The Project Name screen of the Migrate / Store wizard. |
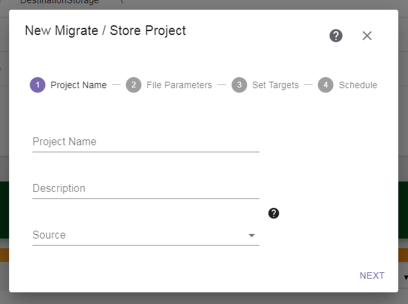
1. | Enter a unique Project Name for the project. |
IMPORTANT |
A project name must be unique across all Scan, Migrate / Store, Restore, and Database Backup projects. Names of deleted projects cannot be reused. The name of a Migrate / Store project can be used to search for the project and associated files. |
2. | If desired, enter a Description for the project. |
3. | From the Source drop-down, select a previously configured storage location (see Configure Storage) to be the source location or select Create New Source and enter a name and the UNC path to create a new Non-Spectra NAS storage location. Sub-directories on the Source display. |
Notes:
• | Only storage locations configured as a Source storage location type are listed in the drop-down. |
• | Create New Source is only available for an Administrator user. The storage location created with Create New Source has the following defaults: |
• | Storage Type: Non-Spectra NAS |
• | Storage Location Type: Source |
• | Description: Created for project: <project_name> |
• | Department and Cost/TiB: blank |
• | Do Not Limit Transfer During Peak Hours |
4. | If you are using a previously configured storage location, you can select a sub-directory on the source as the starting point (Root Directory) for searching for objects to Migrate / Store. |
5. | Click Next to continue. |
Continue with Migrate / Store Wizard—File Parameters